

It is essential to know how to solder silver to make elaborate jewelry.
However, in most cases, when we talk about silver soldering, it is an abuse of language: in reality we are making a silver brazing.
In jewelry we assemble silver pieces by wetting them with silver alloy. This silver alloy, by capillary action, will run along the space between the two parts and hold them together as it cools. This method is commonly used by jewelers when making rings with intricate designs or when they need to resize a silver ring.
We invite you to discover this process in photos, through the work of a designer who creates silver jewellery.
The equipment needed to solder silver.
To solder silver, you need two pieces of solid silver (925 or 950 in the case of this example) and a silver alloy.
It is also necessary to use a liquid that facilitates welding, cleans the welding areas and prevents their oxidation, generally we use Borax.
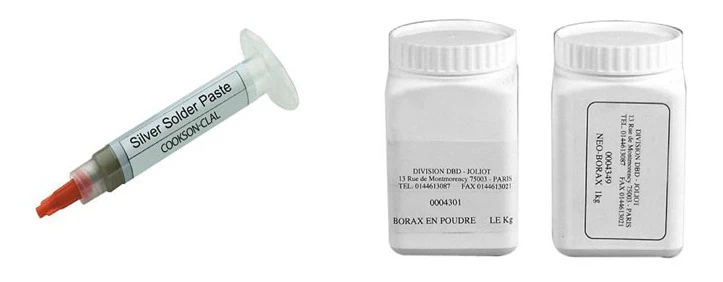
Silver solder is an alloy of silver and copper that has a lower melting temperature than the solid silver we are trying to solder. It is less pure money than the solid silver we work with.
Since silver has a higher melting temperature than copper, the alloy’s melting temperature is lower because its copper content is higher. Therefore, the melting temperature of 950 silver is higher than that of 925 silver, which in turn is higher than that of silver solder.
To weld in good conditions you will also need a refractory brick that can withstand the heat of the torch. A simple kitchen torch may be sufficient if you want to weld occasionally. Also bring tweezers to handle the solder.
How to solder silver?
In the photos below we see the two solid silver pieces that will be used for soldering.
In the second photo we can see the jeweler placing small pieces of solder near the junction of the parts. It then deposits a liquid which, when heated, will clean the parts in contact and prevent oxidation of the weld.
We see in this photo the heating of the two pieces with a torch. In the last photo we can see the braised area where the parts join.
Once the welding is completed, we immerse the welded part in a mixture of water and weakly concentrated sulfuric acid to remove the welding. This allows you to eliminate traces of oxides formed during welding of parts.
Learn silver soldering to make jewelry.
Soldering silver parts is not difficult. However, practice is needed to achieve the desired results, especially when we want to make jewelry. The work is therefore particularly beautiful.
To begin with, it is advisable to start with fairly large silver coins. Soldering silver wires, or thin parts, is more delicate as they will melt more quickly than solid parts.
Soldering small pieces of silver requires more skill and torch control. Also, start by soldering parts of equivalent size. This also makes soldering easier. When you start soldering parts of very different sizes and masses, prepare your assembly and heat only the massive part.
Once up to temperature, it will quickly heat the other part and the solder will melt on its own and flow down the gap between the two parts.
If you don’t follow this process, you risk melting the solder without the solid piece of silver reaching the appropriate temperature for good solder adhesion. Additionally, you risk melting the small amount of silver before you can complete the solder.
Find out in the video how to solder silver:
To make jewelry you need to work with silver in the form of cutting, shaping, hammering, polishing and brushing. However, the soldering operation remains the most important to give free rein to the creation and integration of stones in silver jewelry.
To go further:
latest posts published

Moonstone in jewelry

Engraving of men’s signet rings
Diamond clarity: inventory of natural inclusions

Creation of a Chrisme Medal in 18K Gold

18k gold men’s necklace (handcrafted)

Large 18k solid gold bracelet

18k gold chain pendant

the history and symbols behind the Mo signet ring

Rolex: a brand that has become essential
